Verify equipment task data
When equipment data is read-in to Trimble Ag Software through file imports or wireless connections with vehicle displays or third-party accounts, it’s held for verification before the data becomes part of a field record. You can edit or delete the task details to fix errors, merge or reassign tasks, and control whether to add tasks to maintain the accuracy of your field records and costs. Once you verify the task data, the information can be used in reports and coverage maps in the online account or on the mobile app.
- Log in to Trimble Ag Software online (learn more)
- Select the preferred crop year (top left)
- Click the Field tab (top menu)
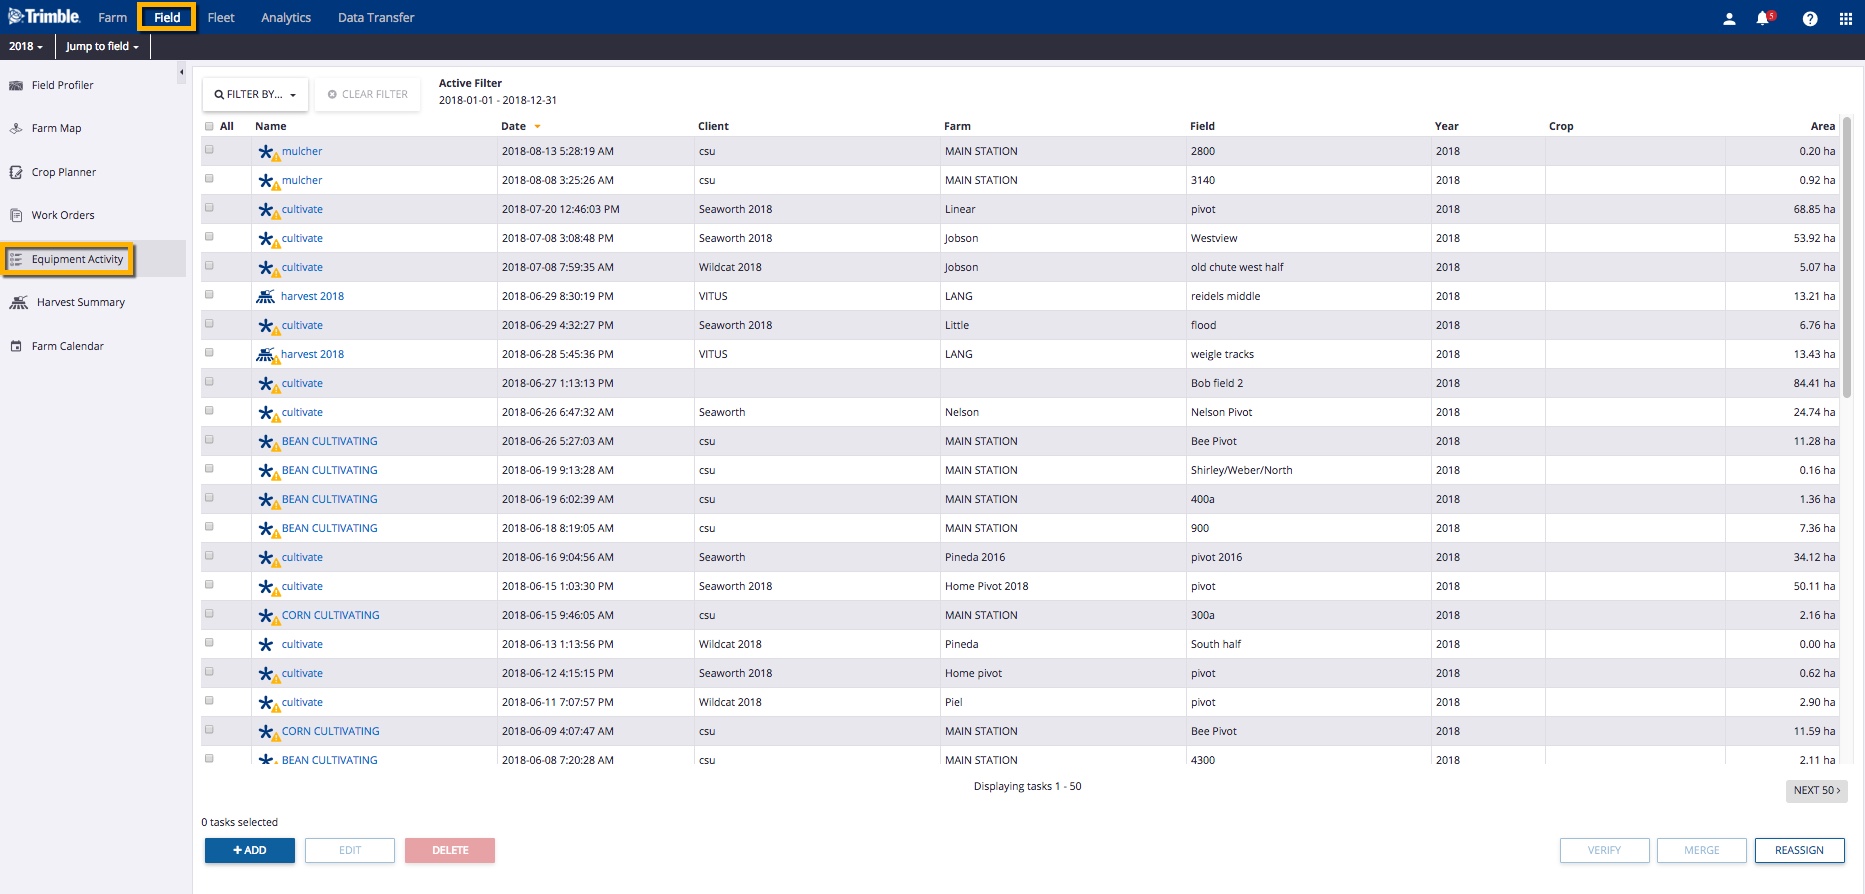
- Select Equipment Activity from the left menu navigation to display a summary of tasks for all fields
- Note: tasks flagged with a warning
 icon will alert you to missing information (such as a crop or crop year) that is required before data can be added to your field records
- Note: tasks flagged with a warning
- Adjust the table view by clicking:
- Filter By to view information by Date, Client : Farm : Field, Crop, Operation, Vehicle, Implement, Operator, Material or Is Verified
- Click X Clear Filter to show the default view
- any column heading to sort table rows in ascending or descending order
- Filter By to view information by Date, Client : Farm : Field, Crop, Operation, Vehicle, Implement, Operator, Material or Is Verified
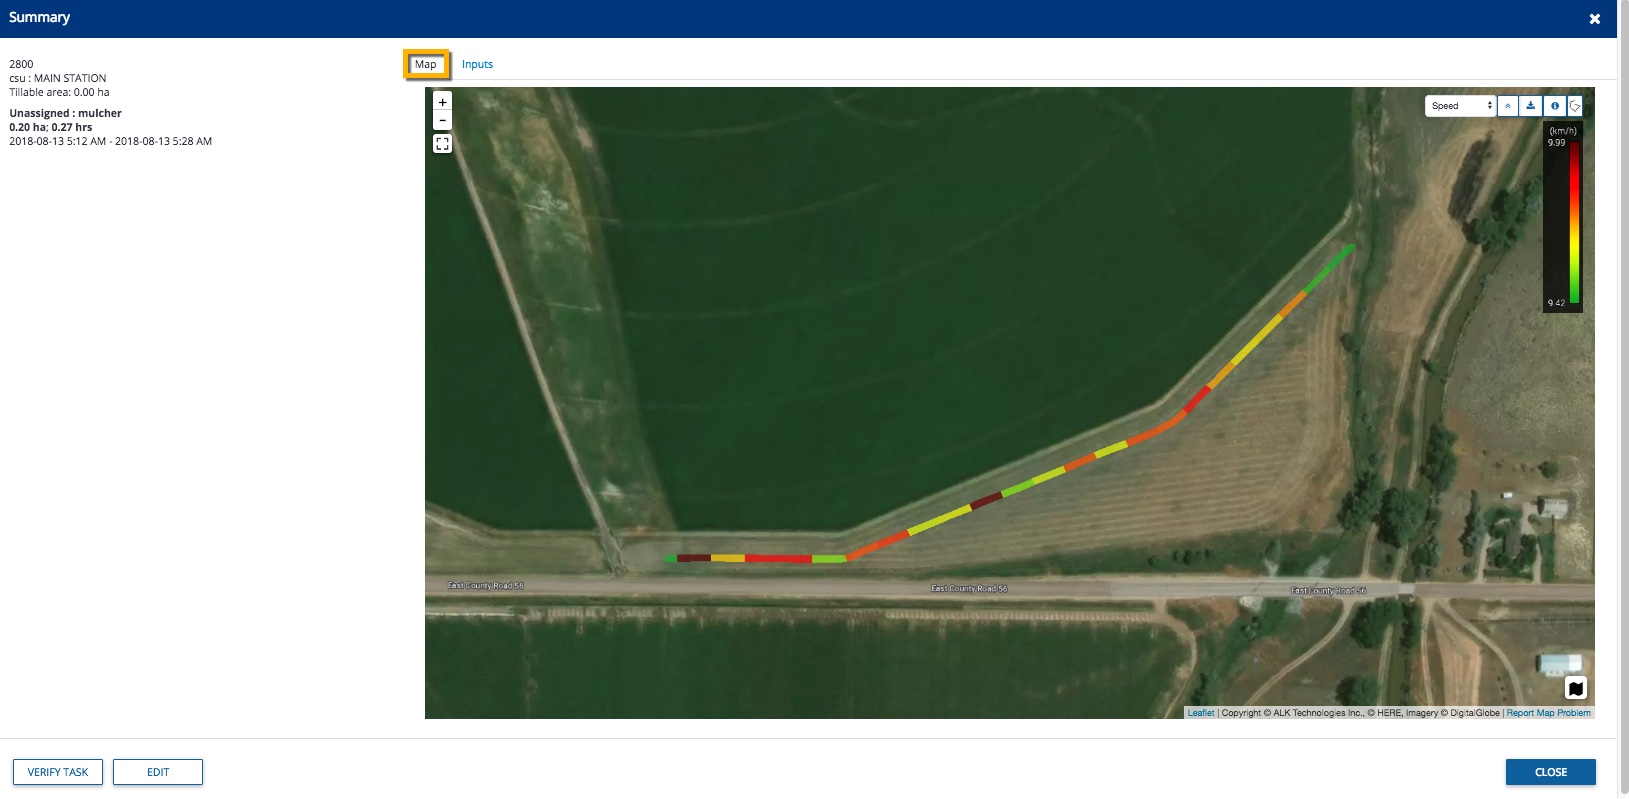
- Click the task Name to display Summary details in a pop-up window, including:
- Map tab with options to view different coverage maps (based on how the vehicle display was configured), change the base map type to Satellite or Roads, download KML or SHP files as well as edit boundary
- From here, you can also click the buttons (bottom left) to Verify Task without changes, or Edit task details (tip: use the Edit option first if the task displays a warning
 icon that indicates missing information, only visible on the main list shown in step 4)
- From here, you can also click the buttons (bottom left) to Verify Task without changes, or Edit task details (tip: use the Edit option first if the task displays a warning
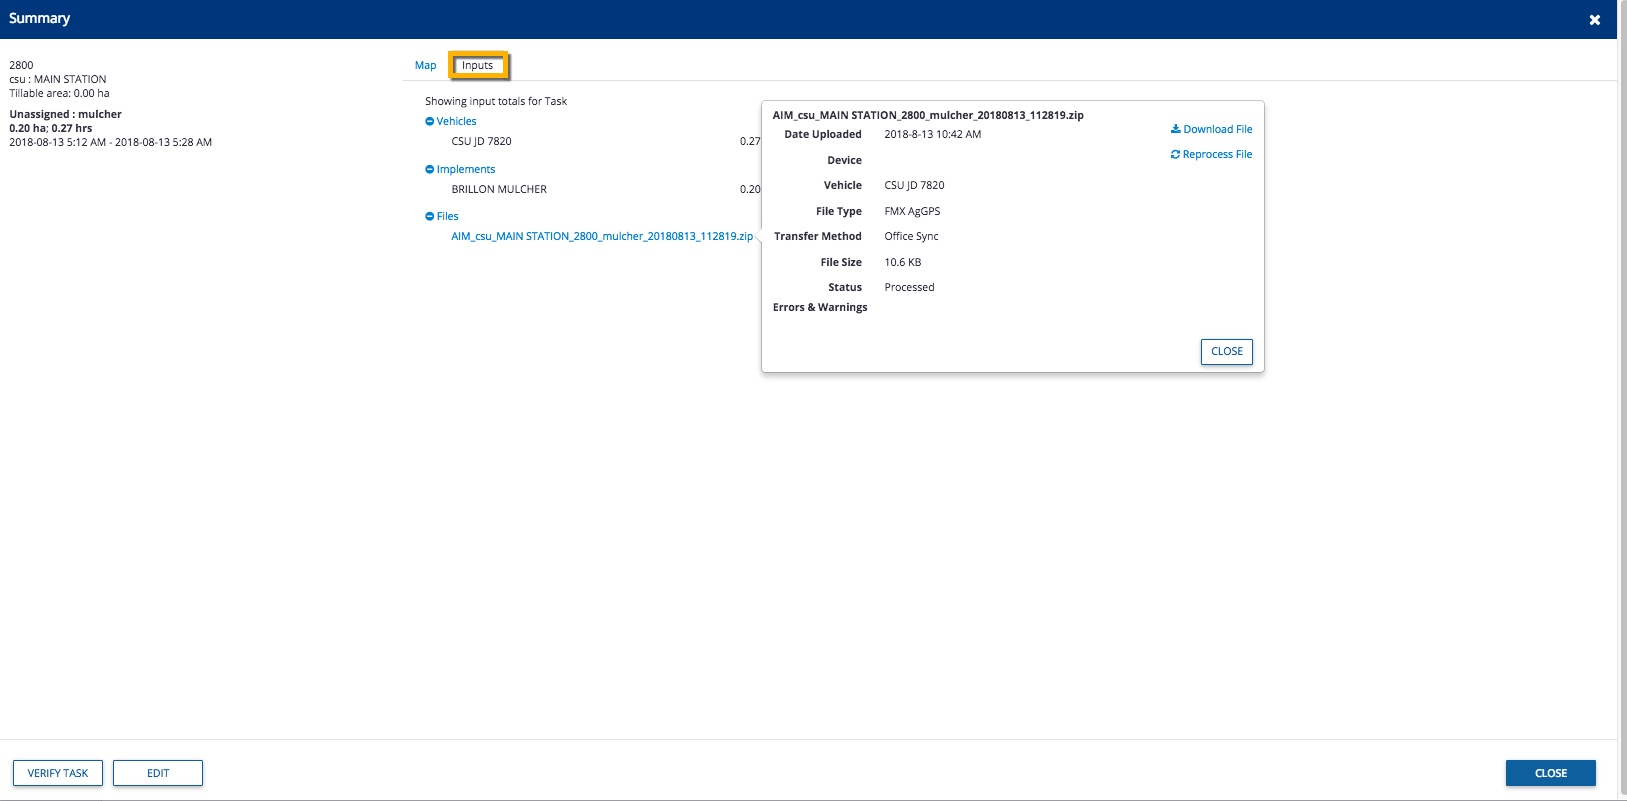
- Inputs tab with details on any vehicles and implements used including duration and cost for the task, as well as a link to files from the display
- Click the file name to view more details, including the File Type, Transfer Method, File Size, Status and Errors & Warnings, with options to Download File or Reprocess File
- Click the buttons (bottom left) to Verify Task without changes or Edit
- Map tab with options to view different coverage maps (based on how the vehicle display was configured), change the base map type to Satellite or Roads, download KML or SHP files as well as edit boundary
- From the main list (shown in step 4) you can also use buttons on the bottom of the screen to manage task data:
- Verify – select one or more tasks to automatically add the data to field records without any changes
- tip: use the Edit option first if the task displays a warning
 icon that indicates missing information
- tip: use the Edit option first if the task displays a warning
- Merge – select two or more tasks associated with the same field to permanently merge data into one task (at the prompt, click Yes or No to continue, as this change cannot be undone)
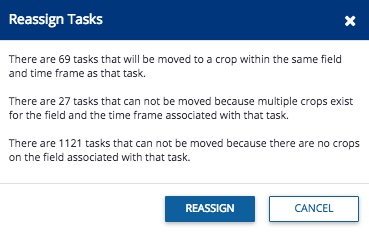
- Reassign – select a task in order to move all other tasks with the same crop to the same field and time frame (crop year), as shown in the confirmation message example below (at the prompt, click Reassign or Cancel, or Edit related tasks to resolve mismatches before trying again)
- +Add – create a new task by selecting a field and manually entering the task details
- Delete – select one or more tasks to remove the data from the Equipment Activity list (at the prompt, click Delete or Cancel)
- Edit – select a single task to review and change the task details, as shown below:
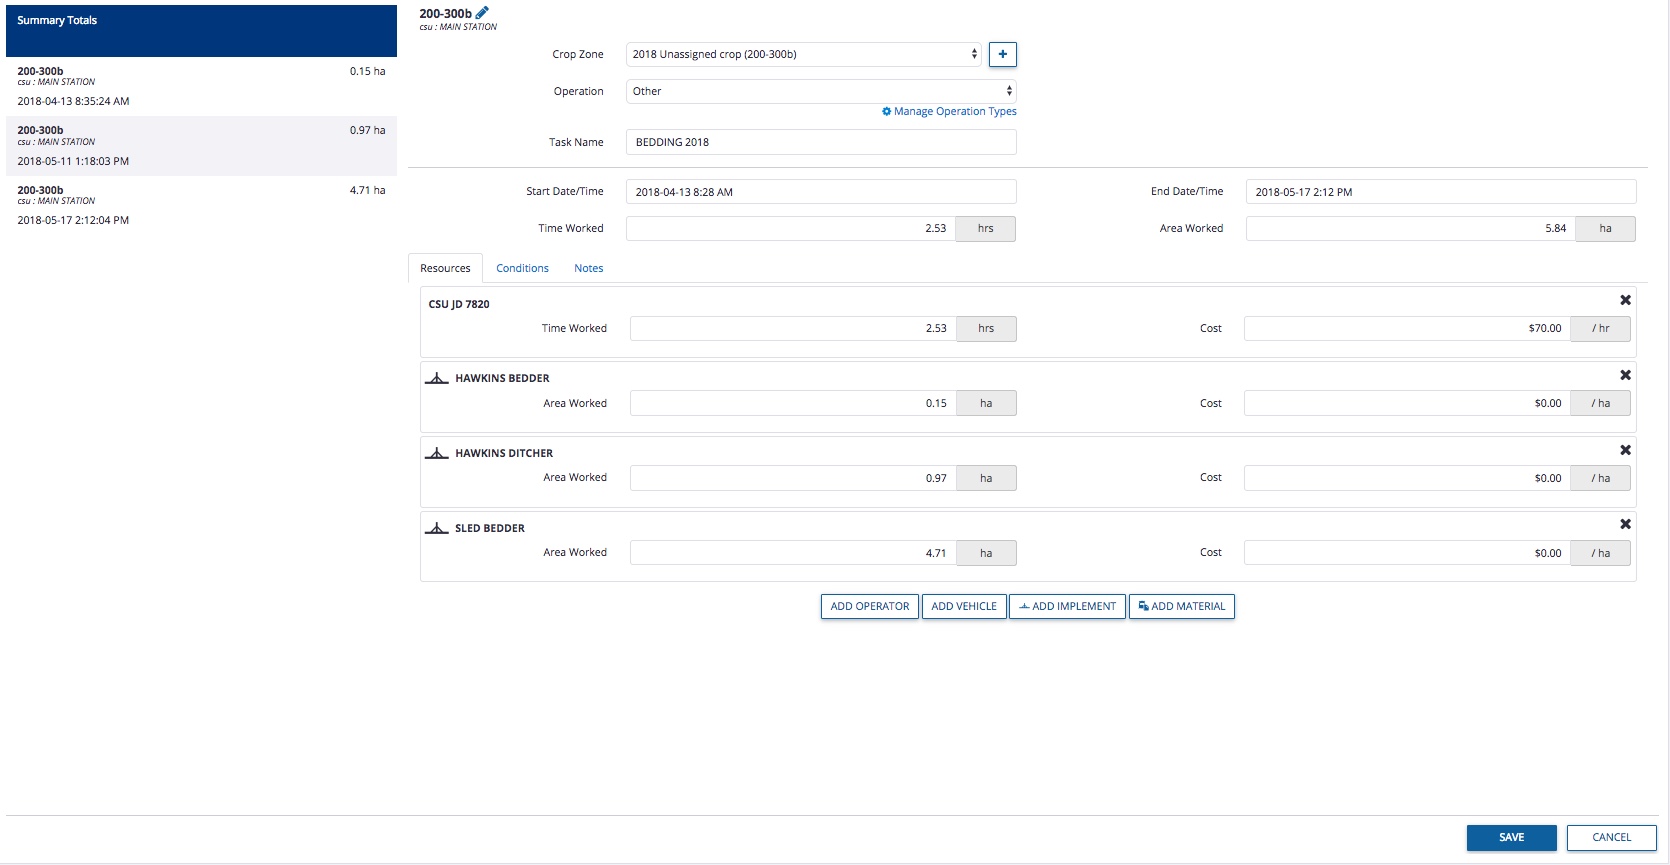
- In the Summary information at the top of the screen, review and edit the following:
- Field name (required) – click the pencil
 icon at the top of the screen
 - Crop Zone (required) – select from the list of crop years in the account, or click the plus
 icon to add a new crop year
 - Task name (required) – click to edit the text displayed
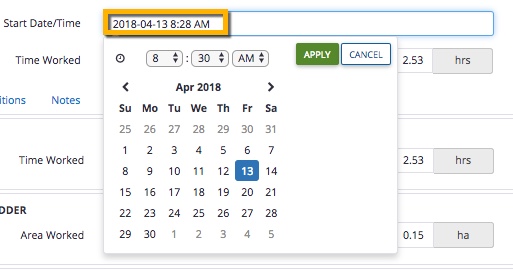
- Start/End Date and Time (required) – click the date and time shown to display the calendar and clock options and change as needed, then click Apply to automatically update the total Time Worked
- Field name (required) – click the pencil
- On the Resources tab, review and edit the following areas (as needed):
- Time Worked, Area Worked and Cost – click to edit the text displayed for each vehicle, implement or operator
- Add Operator – click the button to select a name from the list of operators in your account
- Add Vehicle – click the button to select a name from the list of vehicles assigned to your account
- Add Implement – click the button to select a name from the list of implements assigned to your account
- Add Material – click the button to add a Chemical, Fertilizer, Lime, Mix, Seed or Water from the list of materials in your account
- On the Conditions tab, add information to capture the following (as needed):
- Weather – click to select the Date/Time Recorded and enter text to record Temperature, Humidity, Wind Speed, Wind Gust Speed, select Wind Direction and select Sky observations (note: units of measure shown will reflect your individual settings)
- Field – click to select options for Soil Condition, Growth Stage and Application Method
- On the Notes tab, enter any additional comments
- In the Summary information at the top of the screen, review and edit the following:
- Click Save (or Cancel)
- Verify – select one or more tasks to automatically add the data to field records without any changes
That’s it! Return to the Equipment Activity screen any time to review or change task details. Click here for more ways to view and use vehicle data in your account.
