Add or edit fields online
Add fields to your online account with as much or as little information as you need, with the option to draw or import boundaries to auto-calculate area for boundaries. Start by selecting the preferred crop year, then enter details on each tab before saving all changes at once. Return to this field profile editor any time by jumping to a field or selecting the field name from the Field Profiler list, then click Manage and select Update.
Quick Steps
- Select preferred crop year
- Go to Field > Field Profiler
- Click Manage > Add New Field
- Use the General tab to name your field and draw or import the boundary shape file
- Use the Crop tab to define the crop details, practices and plan for your field
- Use the Legal tab to record the legal land description and latitude/longitude coordinates (visible to North American customers only based on the Country selected in your account Profile online)
- Use the Soil tab to select options to define the soil profile
- Use the Processor tab to track and share food processor service details (contact support for help with adding this option to your account)
- Use the Irrigation tab to select options to define your water management strategy
- Click Save to capture all changes and launch the Field Manager to start tracking field tasks and expenses
Step-by-Step
- Log in to your account online (learn more)
- Select the preferred crop year (top left)
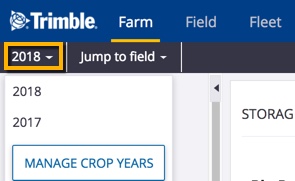
- Click on the Field tab (top menu)
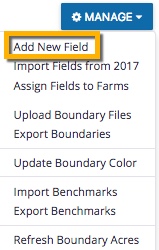
- From the Field Profiler screen that displays a list of fields in your account, click the Manage button (top right)
- Select Add New Field
- The field profile editor is displayed as shown below (note: the left navigation menu disappears when using this screen)

- From the General tab (shown above), enter or select the options below:
- Enter the Field Name (required)
- Select a Client from the dropdown list (or click + to add a client name to the list)
- Select a Farm name from the dropdown list (or click + to add a client name to the list)
- Note: client and farm names are associated with each other in Trimble Ag Software to line up with most vehicle displays; if you’re not seeing a farm name in the dropdown list, check that the related client has been added to that farm under Farms on the Farm tab (learn more)
- Update the Boundary Area (default is 0.00, shown as acres or hectares, depending on your settings) to define the field land perimeter in one of two ways:
- Draw a boundary shape on the map (learn more), then click
 refresh to automatically update both the Boundary Area and Tillable Area with the same number
 - Add a boundary shape file by clicking Import .Shp File, then click
 refresh toto automatically update both the Boundary Area and Tillable Area with the same number
- Note: always add a boundary shape to your field so that you can access more Trimble Ag Software map information for weather, Crop Health Imagery, as-applied coverage maps and vehicle locations across your farm
- Draw a boundary shape on the map (learn more), then click
- If needed, adjust the Tillable Area (also known as Seeded Area) that will also be displayed at the top of the Field Manager Overview screen, to show the tillable area as different from the boundary area (for example, when a field has less planting space due to ongoing issues such as flooding, etc.), by changing this number in one of two ways:
- Manually enter the preferred number (default is 0.00 until a boundary shape has been drawn or imported on the map, in which case the Tillable Area will auto-update to match the Boundary Area)
- Go to the Legal tab (visible to North American customers only) and enter the Seeded Area for one or more parcels of land, which will auto-update both the Seeded Area on the Legal tab and the Tillable Area on the General tab
- Note: the Legal tab also includes an option to record the Cultivated Area, which is not associated with the Boundary Area or Tillable/Seeded Area
- Continue to the next tab, or click Save to launch the Field Manager (return to this field profile editor by clicking the Manage button, then select Update)
- From the Crop tab, enter or select the options below:
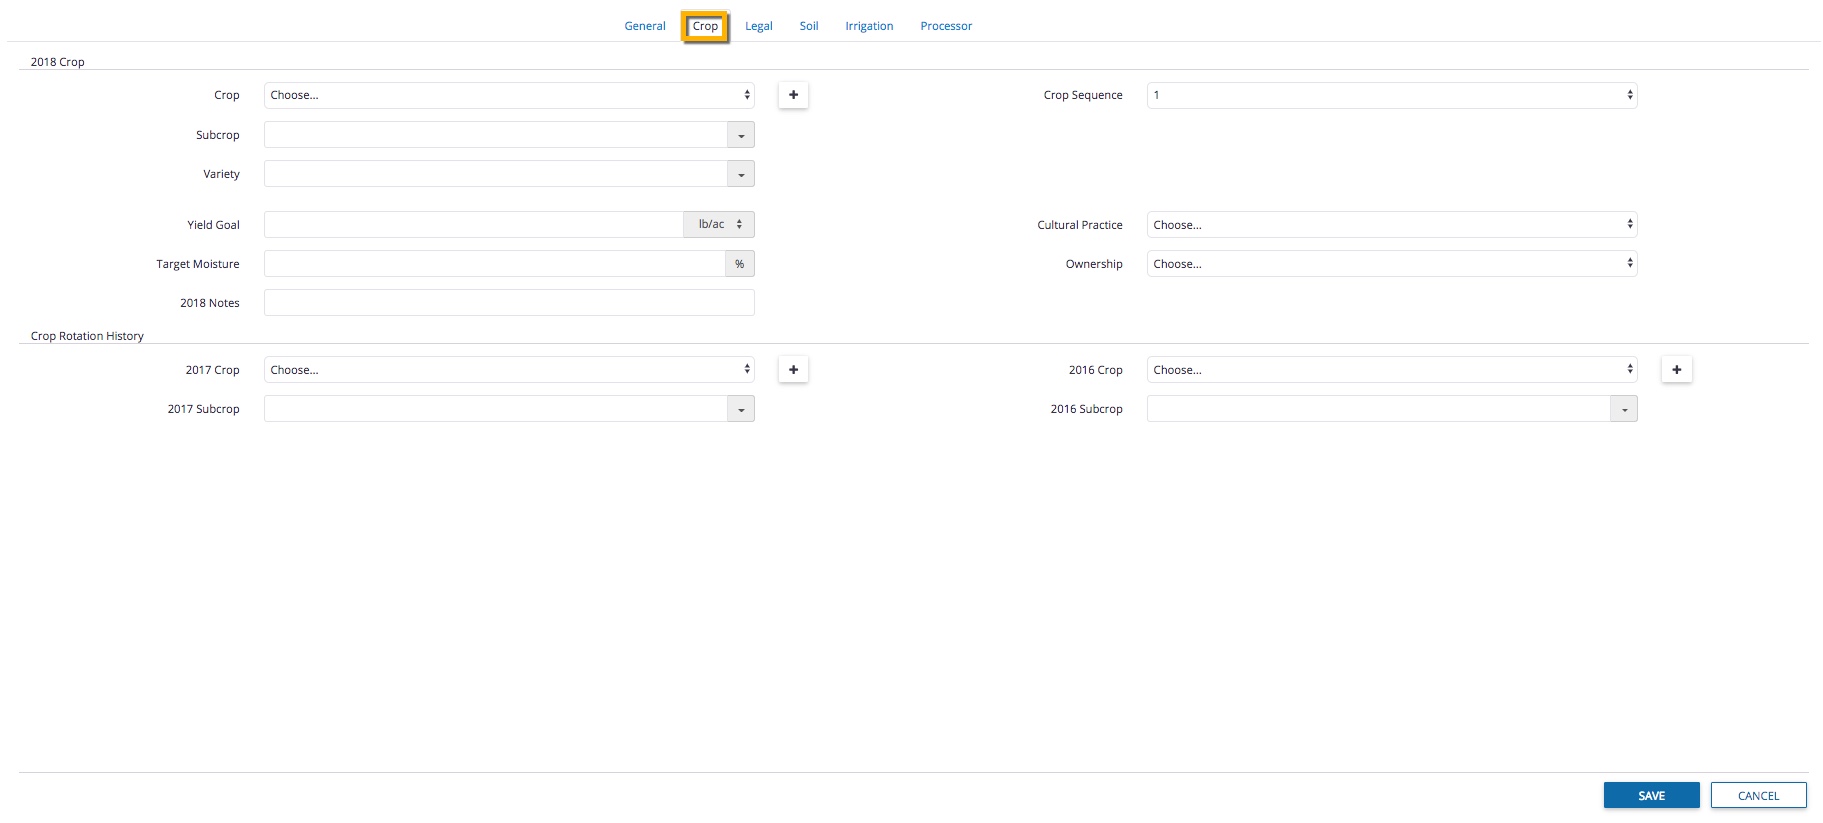
- Select a Crop from the list of crops assigned to your farm (or click + to select from the master crop list)
- Select a Subcrop (if applicable) from the list that automatically matches your selected crop (for example, popcorn is a subcrop of a corn crop)
- Select a Variety (if applicable) from the list that automatically matches your selected Subcrop
- Enter an estimated Yield Goal for each acre (or hectare, depending on your settings), which will be used in crop plans and reports that show projected revenue
- Enter an estimated Target Moisture level as a percentage
- Add any notes for the current crop year
- Select a Crop Sequence from the list (defaults to 1; learn more about adding more crop sequences)
- Select your preferred method of farming from the Cultural Practice list

- Select the type of Ownership for this field from the list

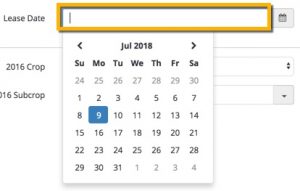
- Select a Lease Date (if applicable) from the calendar by clicking inside the blank field
- Note: a date cannot be added later if the field profile details are saved without a Lease Date
- Note: a date cannot be added later if the field profile details are saved without a Lease Date
- Add Crop Rotation History for the two years prior to current year, by selecting the crop and and subcrop for each year, which will be shown in your crop planning reports
- Continue to the next tab, or click Save to launch the Field Manager (return to this field profile editor by clicking the Manage button, then select Update)
- From the Legal tab (visible to North American customers only based on the Country selected in your account Profile online), enter or select the options below:
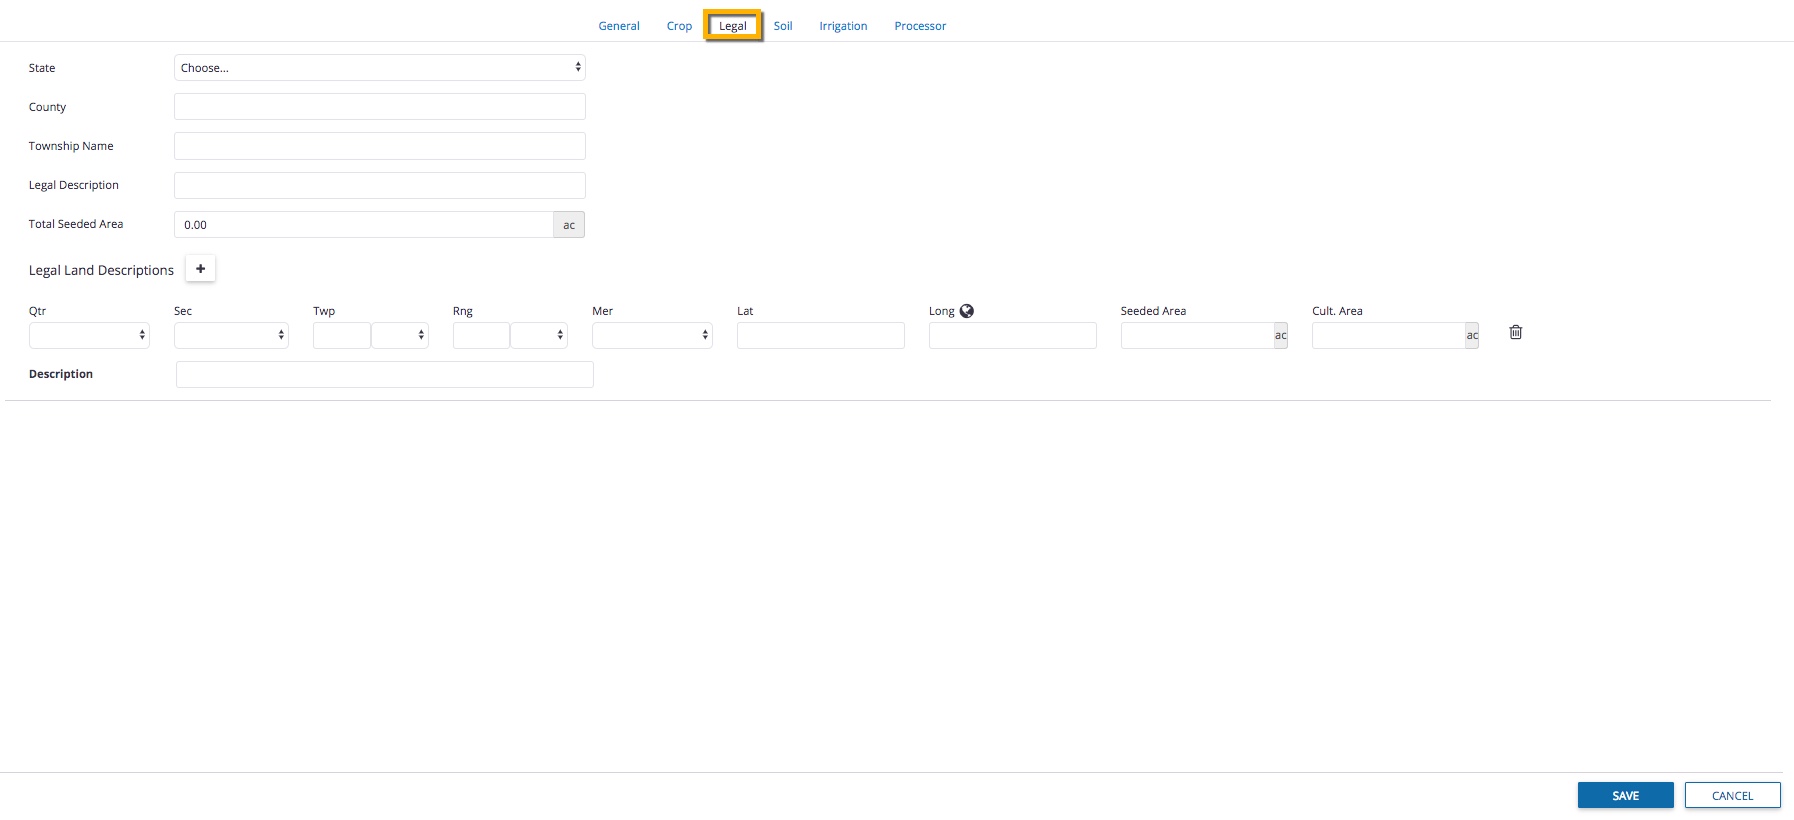
- Select the State (or Province) from the list (options are displayed based on the Country selected in your account Profile online)
- Enter the County name (if applicable)
- Enter the Township name (if applicable)
- Enter the Legal Description (text that defines the legal boundaries of your property)
- If needed, adjust the Total Seeded Area number which will automatically show the combined total of Seeded Area entered for each land parcel (displays acres or hectares, depending on your settings)
- Note: default is 0.00 if Tillable Area on General tab has not been entered or a boundary shape has not been added on the General tab, or until the Seeded Area for one or more parcels of land is entered, as outlined below
- Enter the Legal Land Description (also known as reference points used by land surveys and land title records; regional options are displayed based on the Province or State and Country selected in your account Profile online) by clicking the plus + icon to add or trash
 icon to delete additional locations for each parcel of land, as follows:
- Qtr – select a quarter compass direction from the list
- Sec – select a section number from the list
- Twp – select a township number from the list
- Rng – select a range number from the list
- Mer – select a meridian number from the list
- Lat/Long – enter the latitude and longitude coordinates or click the globe
 icon to automatically generate coordinates from the legal land description entered
 - Seeded Area – also known as Tillable Area on the General tab, enter the total area for each parcel of land
- Note: the Seeded/Tillable Area may be different from the Boundary Area on the General tab in cases where the field has less planting space due to ongoing issues such as flooding, etc.)
- Cult. Area – enter the total cultivated area
- Add a Description with notes for this legal profile
- Continue to the next tab, or click Save to launch the Field Manager (return to this field profile editor by clicking the Manage button, then select Update)
- From the Soil tab, enter or select the options below:
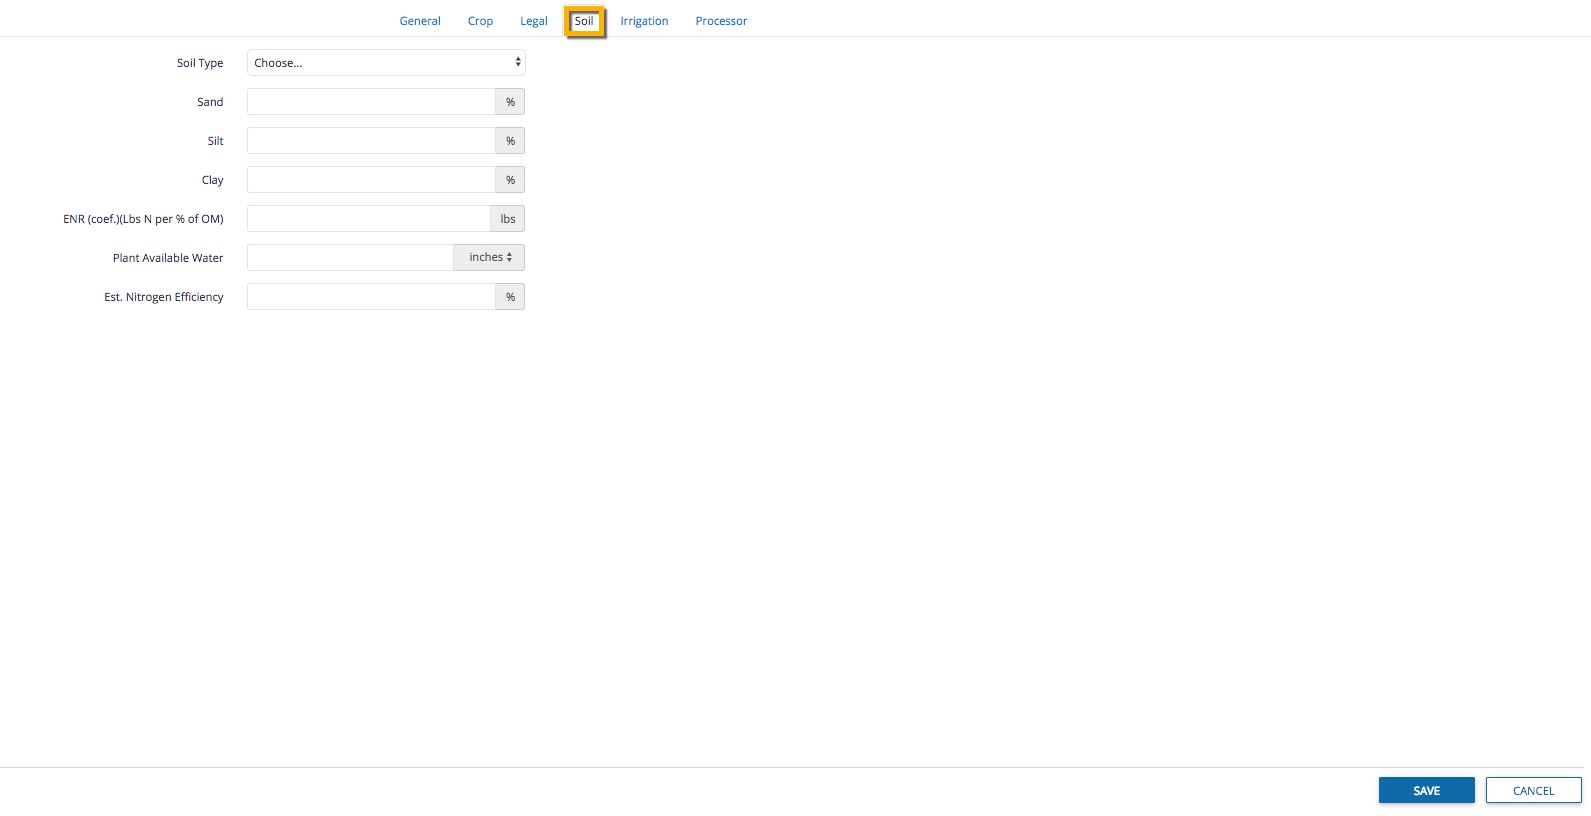
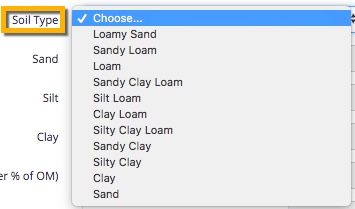
- Soil Type – select your field’s type from the dropdown list
- Sand – enter the percentage of sand found in your soil
- Silt – enter the percentage of silt found in your soil
- Clay – enter the percentage of clay found in your soil
- ENR (coef.)(Lbs N per % of OM) – enter the soil’s estimated nitrogen release
- Plant Available Water – enter the soil’s volume of water available to plants
- Est. Nitrogen Efficiency – enter the soil’s level of nitrogen efficiency
- Continue to the next tab, or click Save to launch the Field Manager (return to this field profile editor by clicking the Manage button, then select Update)
- Soil Type – select your field’s type from the dropdown list
- From the Irrigation tab, enter or select the options below:
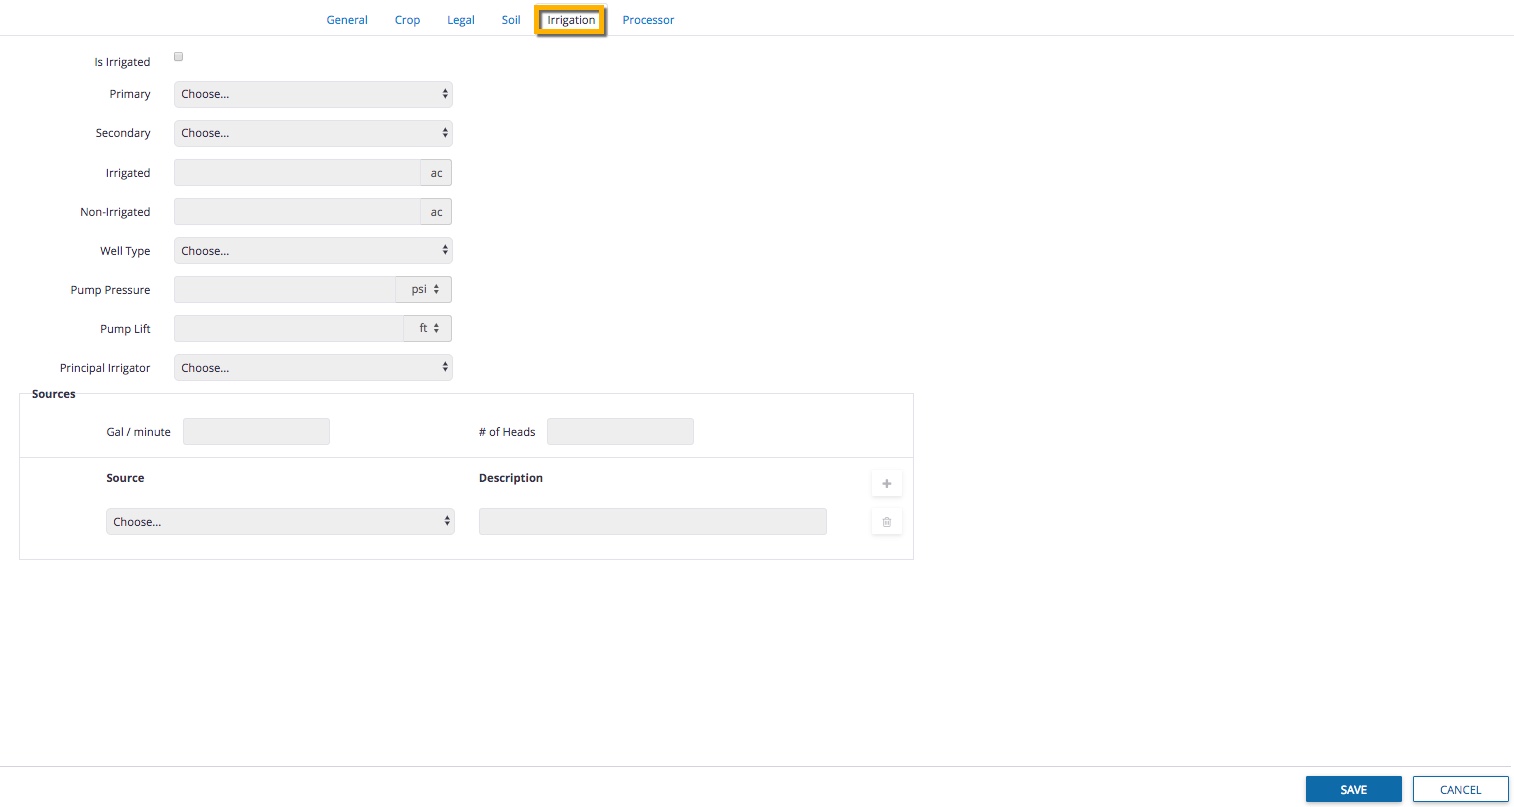
- Is irrigated – click the checkbox to show if this field is irrigated (default when not checked shows greyed-out, disabled options below)
- Primary – select the primary application method from the list
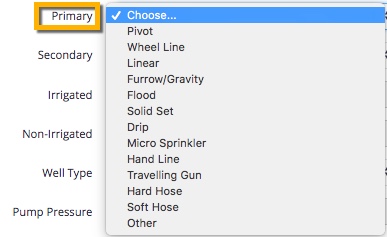
- Secondary – select the secondary application method from the list (same options as listed in Primary above)
- Irrigated – enter the size of the irrigated area
- Non-Irrigated – enter the size of the non-irrigated area
- Well Type – select Single or Shared from the list
- Pump Pressure – enter the pressure value and click the measurement to select psi (pounds per square inch) or kPa (kilopascal)
- Pump Lift – enter the vertical distance from intake into the pump and click the measurement to select ft (feet) or m (meters)
- Principal Irrigator – select Self or Landlord from the list
- Define Sources (click + to add or delete
 additional sources):
- Gal / minute – enter the number of source gallons per minute
- # of Heads – enter the number of irrigation heads
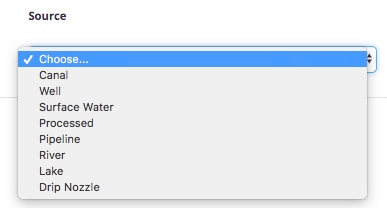
- Source – select the irrigation source from the list
- Description – enter a description with notes on the source
- Continue to the next tab, or click Save to launch the Field Manager (return to the field profile editor by clicking the Manage button, then select Update)
- From the Processor tab (visible on request through customer support), enter or select the options below:
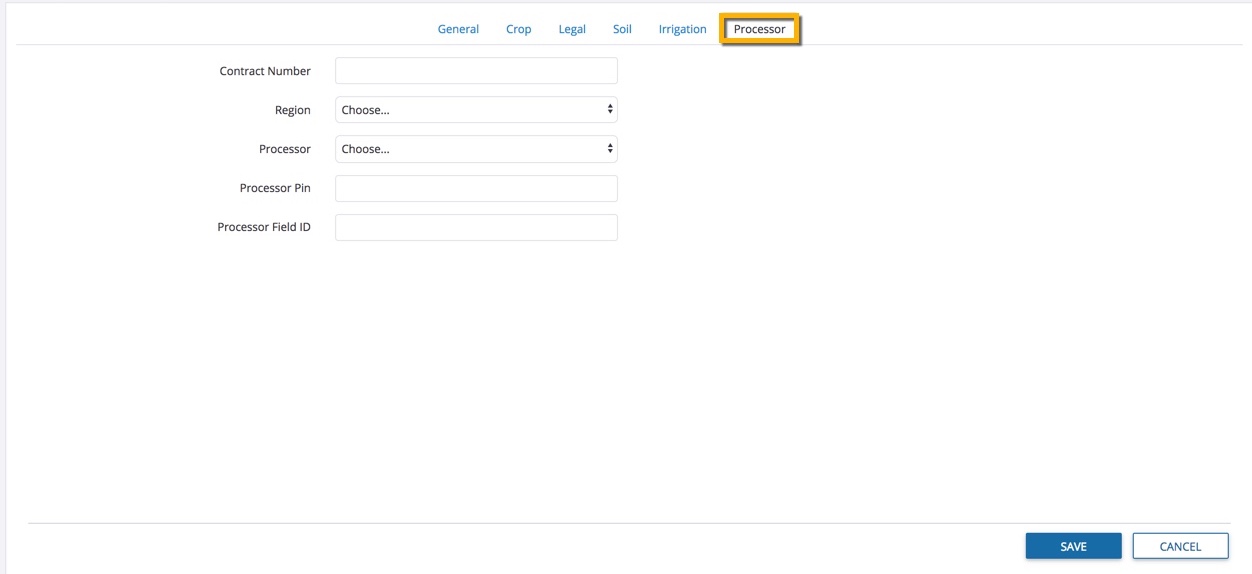
- Contract Number – enter the contract number from your food processor agreement
- Region – select your food processor’s region of operations from the list (visible when set up by customer support)
- Processor – select your food processor from the list (visible when set up by customer support)
- Processor PIN – enter the personal identification number used to authenticate data sharing from your Trimble Ag Software account to your food processor
- Processor Field ID – enter the corresponding ID for this field location from the food processor’s system
- Click Save to launch the Field Manager (return to the field profile editor by clicking the Manage button, then select Update)
