Screen Layout
Hardware Activations
Available Licenses in Hardware Activations
Adding a device
Assigning a license to Hardware
Transferring a license
Export
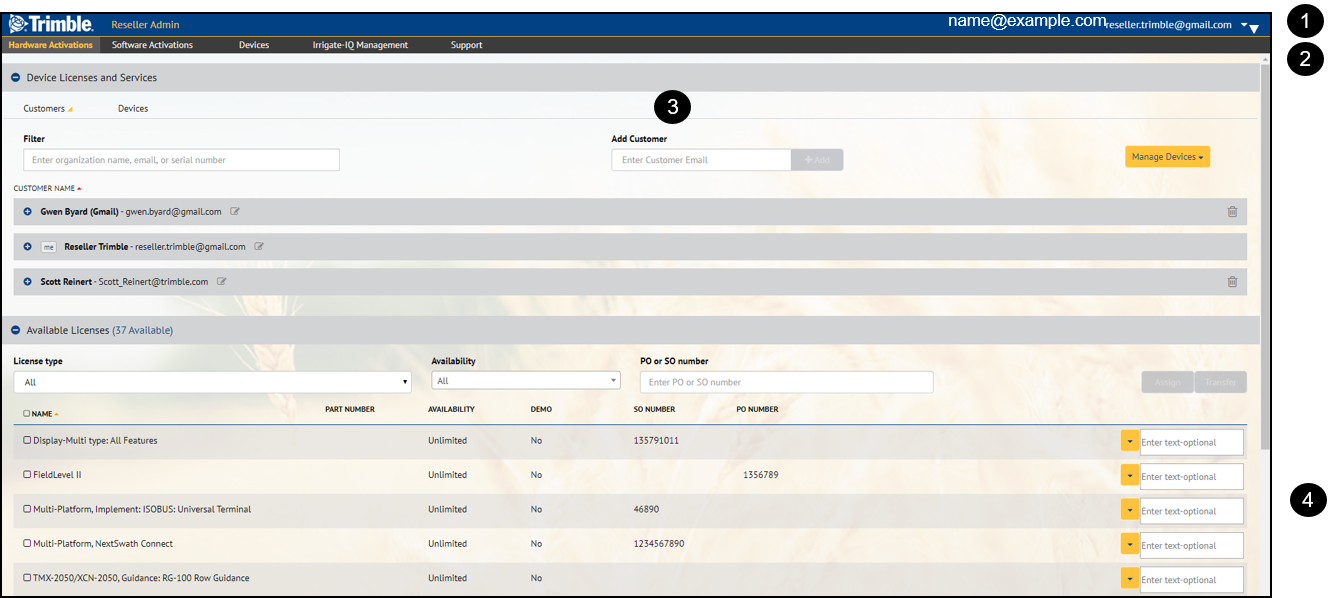
Device Licenses and Services
Customer View
Device View
Adding a new customer
Delivering device entitlements
Transferring a device
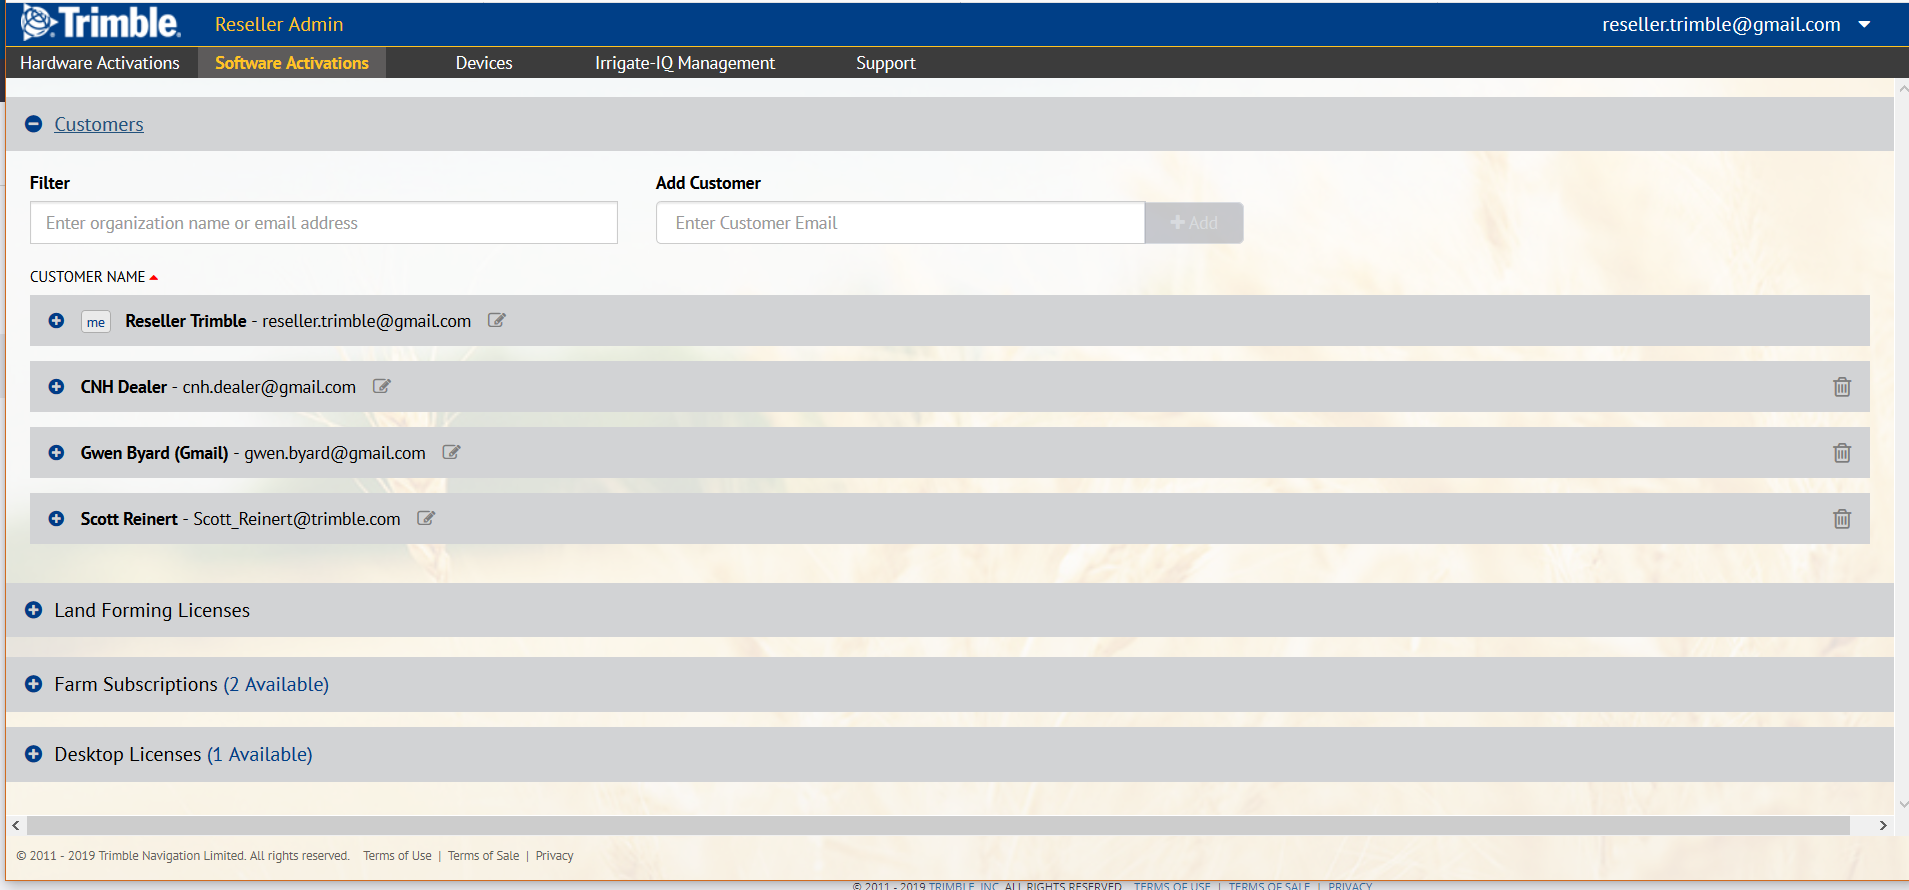
Software Activations
Assigning a license to a customer organization
Assigning a license to a customer
Devices screen
Upgrading a DCM-300 modem
Product overview
The Ag Reseller Admin website is designed for use by Resellers and is used to manage common administration tasks, including the following:
-View the devices in your organization and your customers’ organizations, including the TMX-2050™ display, GFX-750™ display, GFX-350™ display, DCM-300 modem, FmX® integrated display, and the CFX-750™ display.
-Assign hardware licenses. Licenses may be permanent or have an expiration date. They are activated on the Ag Reseller Admin website to TMX-2050, GFX-750, and GFX-350 displays from the Hardware Activations screen. You will be able to:
*Track the licenses assigned by device serial number.
*Deliver device licenses.
*Keep track of any expirations and assign demo licenses.
*Associate licenses to the appropriate display serial number.
*Transfer devices to a linked organization.
*Upgrade firmware for the DCM-300 modems over-the-air. (legacy product)
*Link to the Trimble Support page to login and access existing cases or create new ones.
*Assign Landforming licenses.
*Assign Trimble Ag Software licenses.
*Add or remove customers and manage their devices.
*Add a device.
You can access the Ag Reseller Admin site through any Internet browser such as Microsoft® Internet Explorer®, Apple Safari, Mozilla Firefox, or Google™ Chrome.
Screen layout
Description
Hardware Activations screen

This screen allows you to access the following information:
| Item | Description |
|---|---|
| Device Licenses and Services | A list of all the assigned device licenses and services, grouped by Customer or by Device. See Device Licenses and Services. |
| Available Licenses | A list of all available licenses. See Available Licenses. |
Available Licenses in Hardware Activations
This page shows a list of all the licenses that you currently have available to assign to a device or to transfer to another reseller’s organization.
From here, you can also assign a license. See Assigning a license to Hardware.
Adding a device
Add Device enables a reseller to add a device to a customer’s organization. In most cases, a device can only be added if it does not already belong to another organization.
- In the Customers page of the Hardware Activations screen, from the Manage Devices drop-down list, select Add Device:
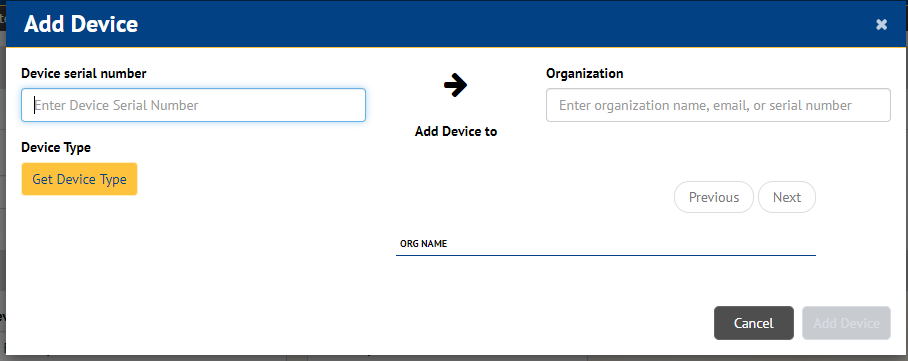
- Enter a Device serial number.
- Click Get Device Type – you may need to select from the drop-down list.
- Enter an organization name or email address of the organization owner. As you start typing the name, a list of options appear. Select the appropriate organization:
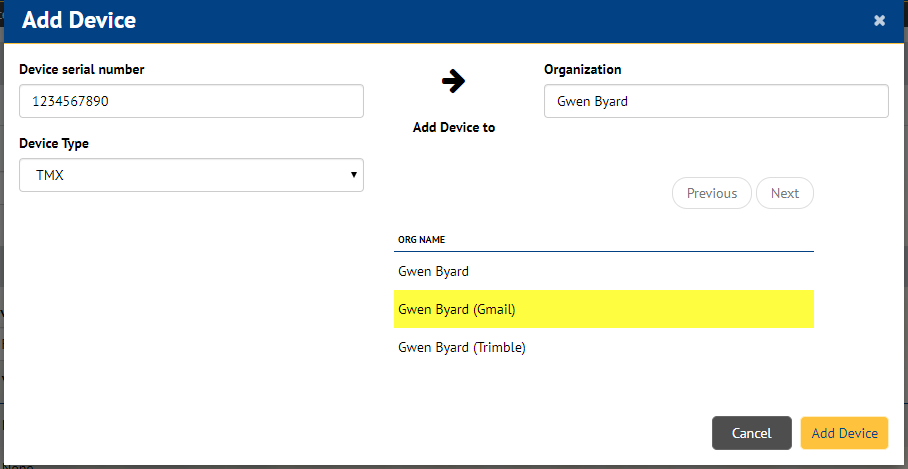
- Click Add Device.
Assigning a license to Hardware
- Click the + sign next to Available Licenses to open the list of licenses if this is not already open.
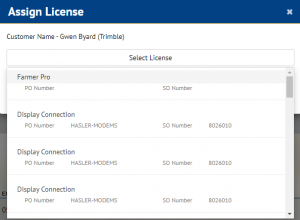
- Click the drop-down menu and select Assign next to the item that you want to assign. The Assign License screen appears. This shows the License type:
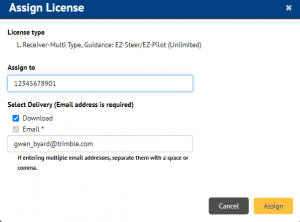
- In the Assign to field, enter the device serial number that you want to assign the license to.
- Select a delivery method. The options are Download and Email. Email is required.
- If you select Download, the licenses can be downloaded to a USB drive and then transferred to the display.
- An email address is required for assigning a license. By default, the email address that was used to sign into the admin site will be populated in the box. Multiple email address may be entered, separated with a space or comma.
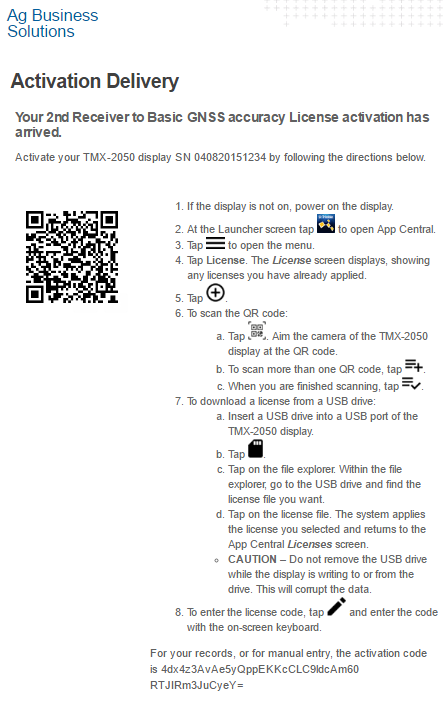
- Click Assign. The License will now appear in the website with the device it was assigned to. If you chose download, a text file will be downloaded. A message, including both a QR code and an activation code is automatically generated and sent to the email address(es) you entered:
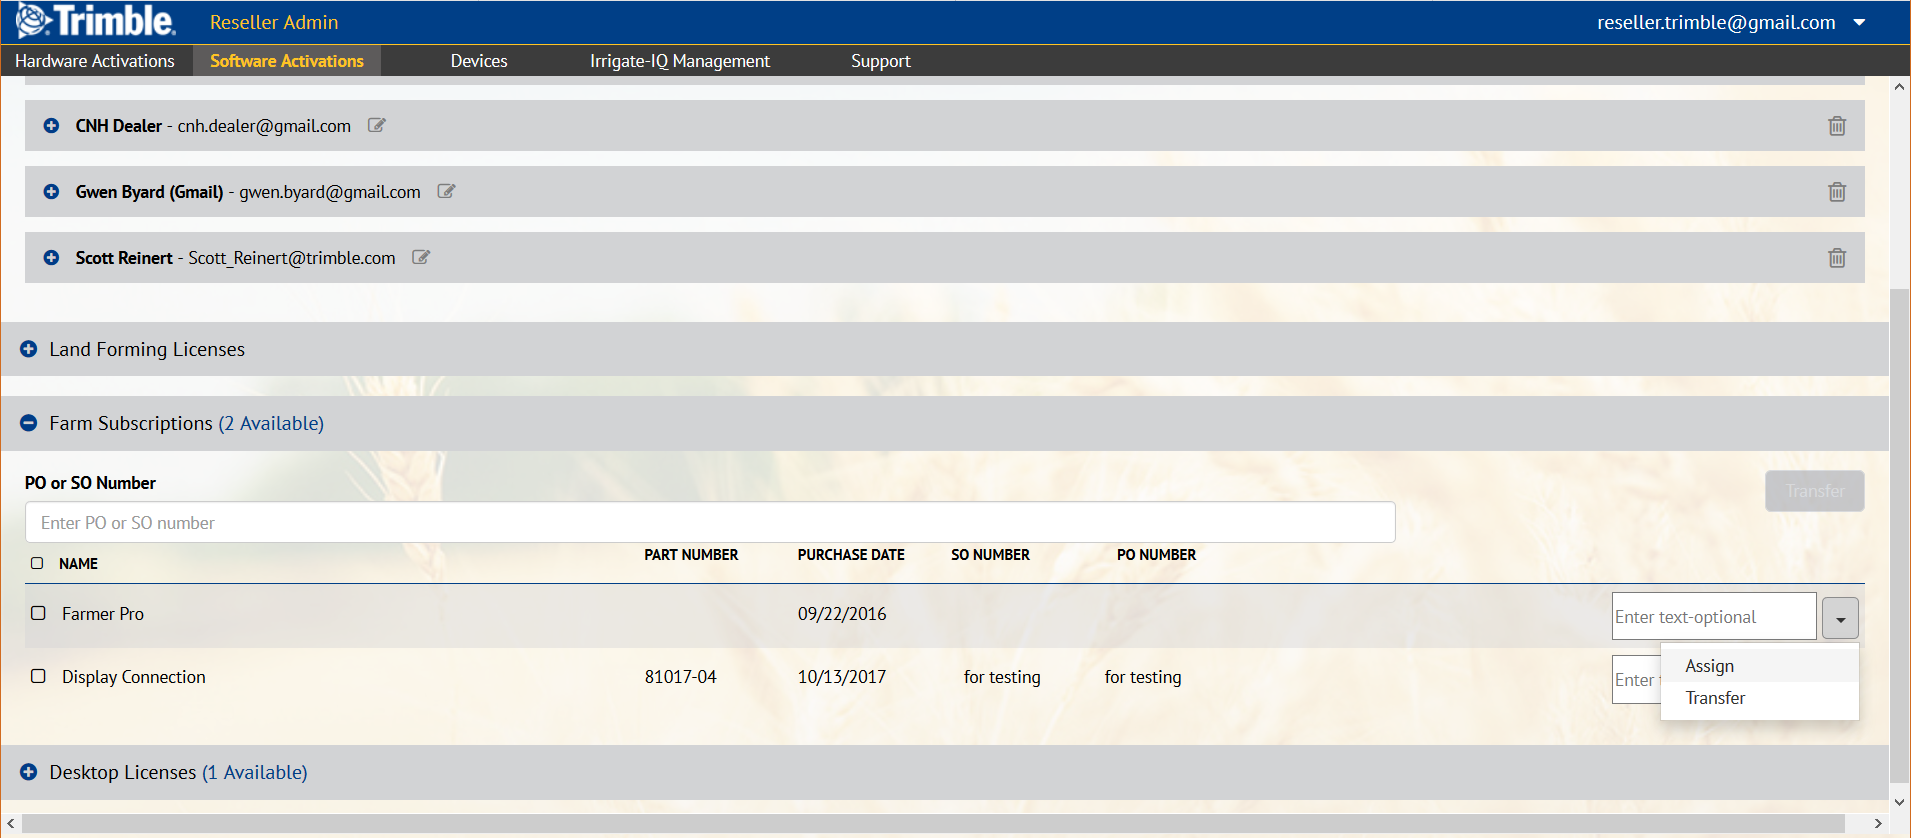
Transferring a license
You can transfer a license to a sub-reseller or other reseller organization. To do this:
- On the Hardware Activations (or Software Activations) page find the license that you want to transfer. If required, filter by License Types to help you find the license.
- From the drop-down menu next to the license you want to transfer select Transfer:

Note – Licenses can only be transferred to an organization with Ag Reseller Admin site access.
- In the Transfer To screen, select the appropriate Organization and then click Transfer:
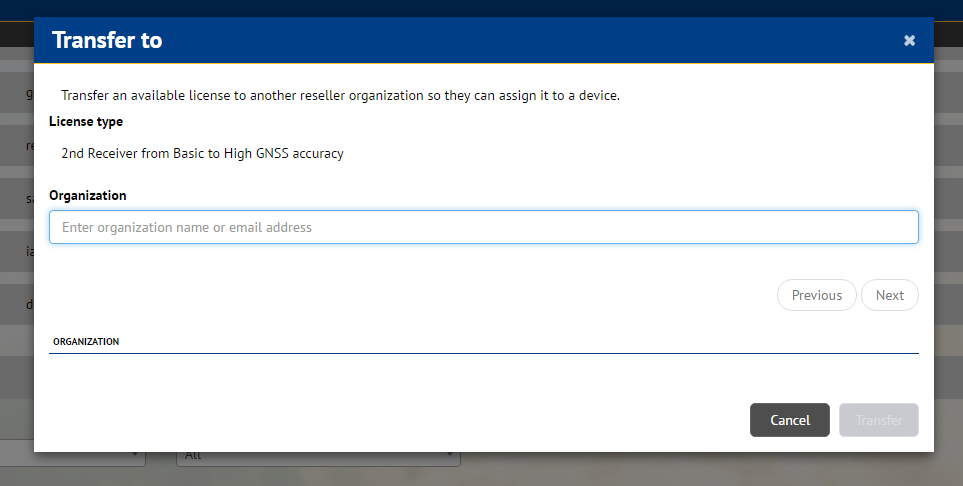
Note – Transferring a license does not activate the feature or “start the clock” on the license – it just moves an available license to another organization so they can then transfer or assign it. Assigning a license to a device or an organization activates the feature for that organization or device.
Export
You can export all device, license, and organization information from the Hardware Activations page to a csv format file.
Device Licenses and Services
There are two views available – the Customers view and the Device view. The views are explained in more detail below.
Customers view
When you click the + sign to open the Device Licenses and Services section of the Activations tab, the Customers tab appears by default. You can filter your view by organization name, email address or serial number.
This screen shows the following information—to view more detail, click the + sign next to a customer name:
Description
| Item | Description |
|---|---|
| Add Customer | Enables you to add a new customer. See Adding a new customer. |
| Manage Devices | Click the button to open the drop-down list. From here you can select one of the following:
|
| List of customers | A list of all your customers and your own reseller organization appears in this view. If you click the + sign next to a customer name, you can see a list of Devices (CFX-750, FmX, TMX-2050, GFX-750, GFX-350 displays and the DCM-300 modem) associated with that customer. For TMX-2050, GFX-750 and GFX-350 displays, it shows a Device Package that can be expanded to see more detail.
You can filter on an individual customer by device name, vehicle name or device type. If available, click the < sign next to a Device Package to see more details:
Device Package information includes the following:
To deliver the package to a client or other recipient, click Deliver. See Delivering device entitlements. |

Device view
Once you have clicked the + sign to open the Device Licenses and Services section of the Activation tab, click Devices:

This screen shows a list of all Devices in all organizations that are associated with a Reseller account – they are not sorted by customer.
You can filter on this tab by device name, vehicle name or device type.
Click the < sign to see details of each Device Package. The following information appears:
- The name of each element of the package.
- The Device Type.
- The vehicle it is associated with, if any.
- The Effective Date of each element.
- The Availability and Demo status for each element.
- Purchase Order number and Sales Order number, if available.
- The remaining time, if any.
- Optional text box for notes.
To deliver the package to a client or other recipient, click Deliver. See Delivering device entitlements.
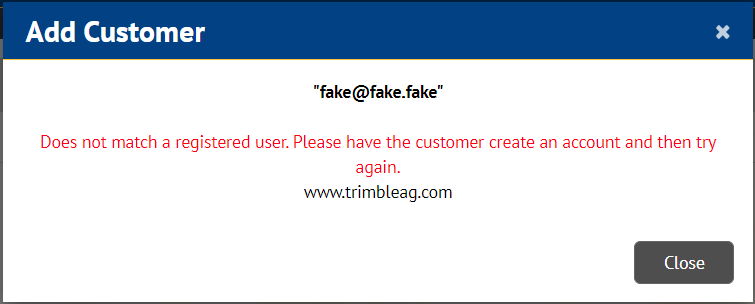
Adding a new customer
Note – The Ag Reseller Admin site supports a reseller hierarchy. Resellers who have sub-reseller partners can view their sub-resellers and their sub-resellers’ customers on the Hardware Activations or Software Activations pages. Resellers who do not have sub-resellers will not see a change in how they view their customers. Resellers can assign licenses to any device or organization visible to them in the Ag Reseller Admin site including sub-resellers and end customers.
- To add a customer, on the Hardware Activations page on the Customers tab, or on the Software Activations page, enter the customer’s email address in the Add Customer field and then click Add:

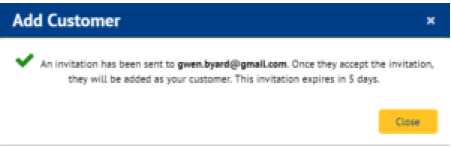
- In the Add Customer screen click Add again to confirm adding the customer:
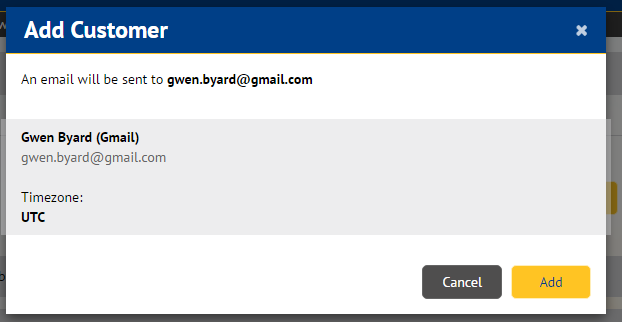
A confirmation message appears, stating that an email was sent to the customer and reminding them of the 5 day period within which the customer can accept.
- When the customer receives the email inviting them to connect with the reseller, they can do one of the following:

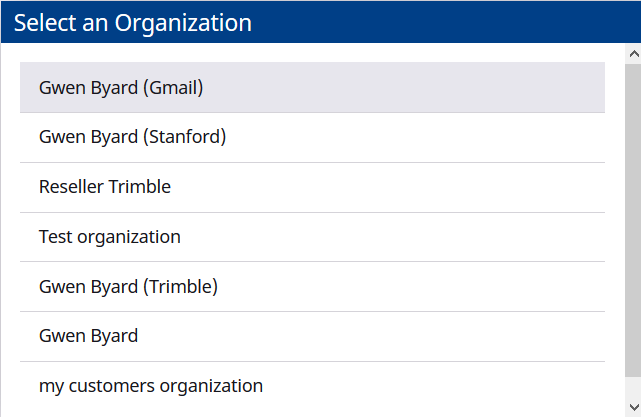
- Click Accept. The customer is prompted to log in to their account and select an organization to connect with the reseller.
- Do nothing. The invitation expires in 5 days.
- Click Accept. The customer is prompted to log in to their account and select an organization to connect with the reseller.
- After choosing an organization, the customer sees the window confirming that they want to connect this organization with their reseller. If they click Accept, their organization is connected to their reseller’s organization, and the customer sees a confirmation window. If they click Cancel, there is no connection.

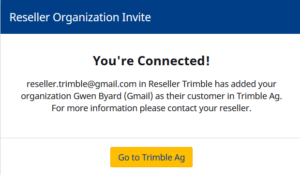
The customer also receives a connection confirmation email.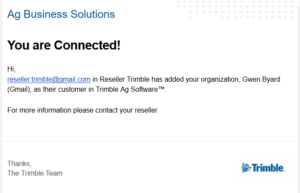 The reseller will now see the customer in their list of customers in the Reseller Admin site.
Note – If the email you enter is not associated with a Trimble Ag Software user, the name is not added. To create a Trimble Ag Software Account, go to www.trimbleag.com. The customer can create a new Trimble Ag Software account.
Delivering device entitlements
You can deliver device entitlements, for example, to send a customer their licenses for their display.
- In the Customers page of the Hardware Activations screen, open a customer folder (click the + sign) and then click Deliver next to the Device with licenses that you want to deliver. Alternatively, in the Devices pages of the Hardware Activations screen, click Deliver next to the Device with licenses that you want to deliver. The Deliver Device Entitlements screen appears:
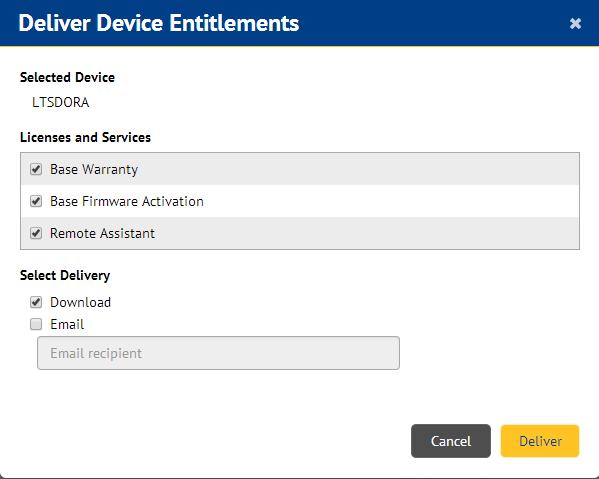
- Select or clear the check boxes next to the Licenses to determine which elements will be delivered. The default is that all non-expired licenses are selected.
- Select a delivery method. The options are Download or Email:
- If you select Download, the Licenses and Services can be downloaded to a USB drive and then transferred to the display.
- If you select Email, you must also enter an email address.
- Click Deliver. A message, including both a QR code and an activation code, is automatically generated and sent to the email address you entered:

Transferring a device
Device Transfer lets the reseller move a device from their organization to another organization that they are linked to.
- In the Customers page of the Hardware Activations screen, from the Manage Devices drop-down list, select Device Transfer:
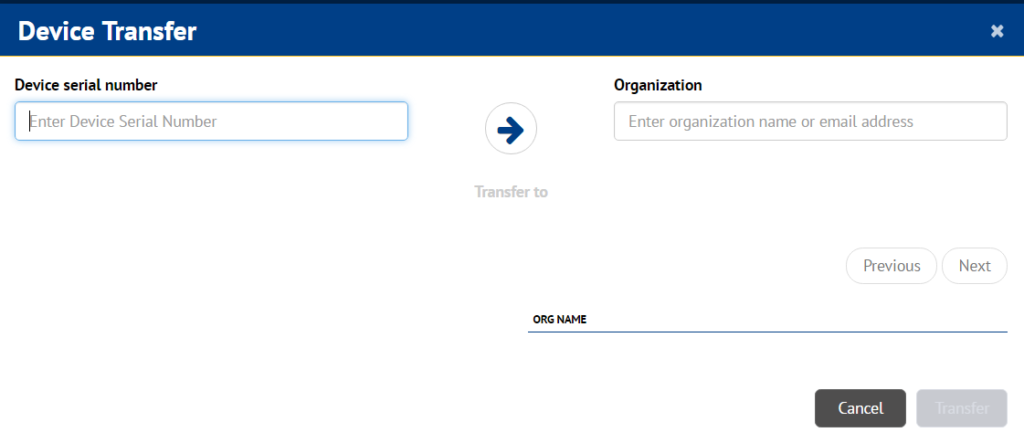
- Enter a Device serial number.
As you start typing the number, a list of options appears. Select the appropriate number. - Enter an organization name.
As you start typing the name, a list of options appear. Select the appropriate name: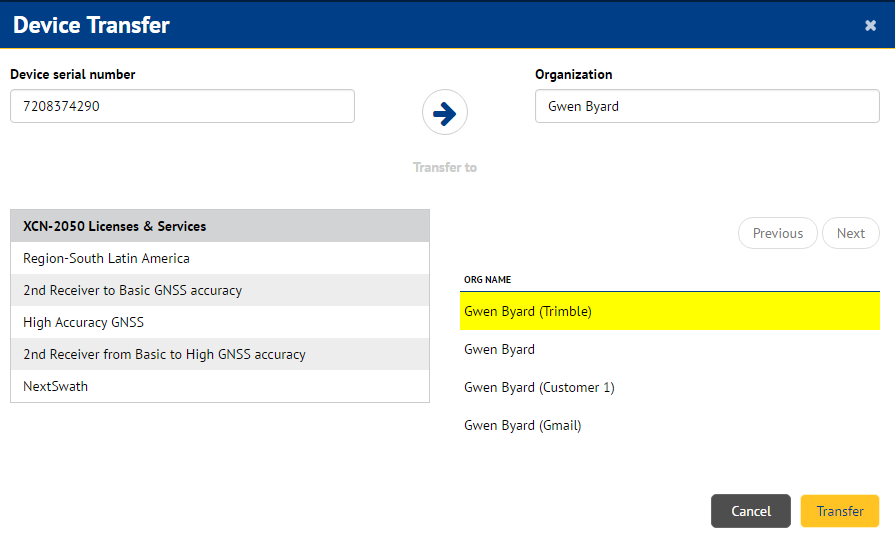
The Licenses that are associated with the device appear on screen. - Click Transfer.
Software Activations screen

This screen allows you to access the following information:
| Item | Description |
|---|---|
| Customers | This section lists all the customers that you are associated with. If you expand an individual customer it will show all licenses assigned to that organization. |
| Land Forming Licenses | This section is for used to assign landforming software licenses to an organization. It shows all landforming licenses available to assign or transfer, and provides the tools to assign or transfer the license. |
| Farm Subscription Licenses | A list of all available Farm Subscription and other complementary licenses that are available for assignment to a customer or transferring to another reseller organization. |
| Desktop Licenses | A list of all available Desktop software licenses that are available for assignment to a customer or transferring to another reseller organization. |
In the Software Activations page, sub-resellers and customers for an organization can be seen in the Customers section. Sub-resellers are visible if you expand a reseller organization using the ‘+’:
A reseller must click Assign to enable a feature by assigning it to an organization. Transfer is used to move an unused license to a reseller organization, as is done on the Hardware Activations page:
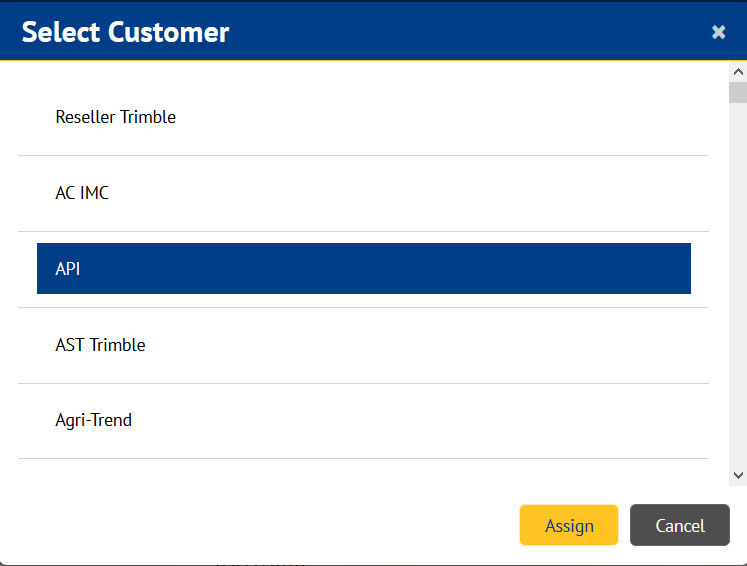
Assigning a license to a customer organization
- Expand the Desktop Licenses, Farm Subscriptions or Land Forming Licenses node to see a list of purchased bundles that are available to be assigned to a customer:

- Before you can assign a license to a customer, the customer must be added so that it is linked to the Reseller organization. To view customers linked to the Reseller organization, open the Customers section. If the customer does not appear on the list, enter the customer’s email address in the Add Customer field and then click Add. The system will check to see if there is an account associated with that email address. If there is no account set up, the customer should create an account. See Adding a new customer.
- To assign a license to your customer, return to the available licenses listing, click the drop-down menu next to the license that you want to assign and then select Assign.
- In the Select Customer screen, choose a customer organization from a list:
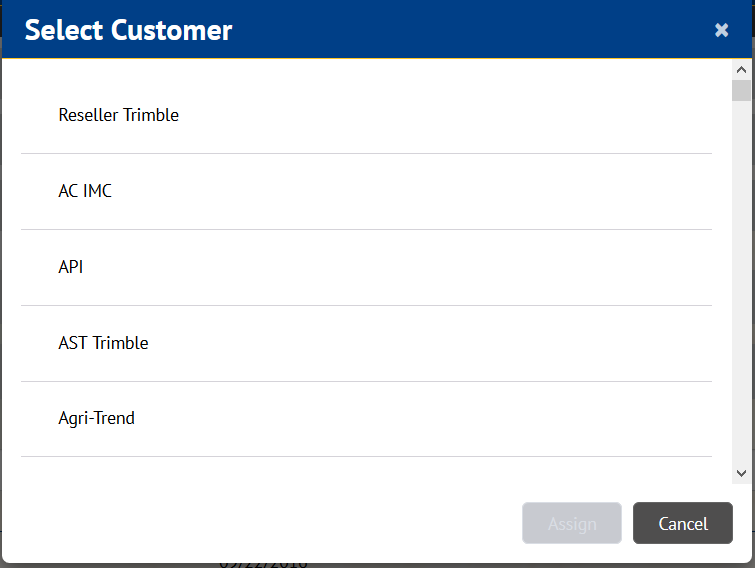
- Select an organization from the list and then click Assign. If successful, a confirmation message appears.
Note – Transferring a license does not activate the feature or “start the clock” on the license – it only moves the license to another organization. Assigning a license to a device or an organization activates the feature.
Assigning a license to a customer (customer-first workflow)
You can also use the following procedure to assign software licenses:
- On the Software Activations page, select the customer you want to add the license to and expand the customer entry. Click Add:

- Select the type of license that you want to add:
- If you choose a Farmer type of license and want to add Display Connections or other add-on licenses, select the number of additional licenses that you want to add on:
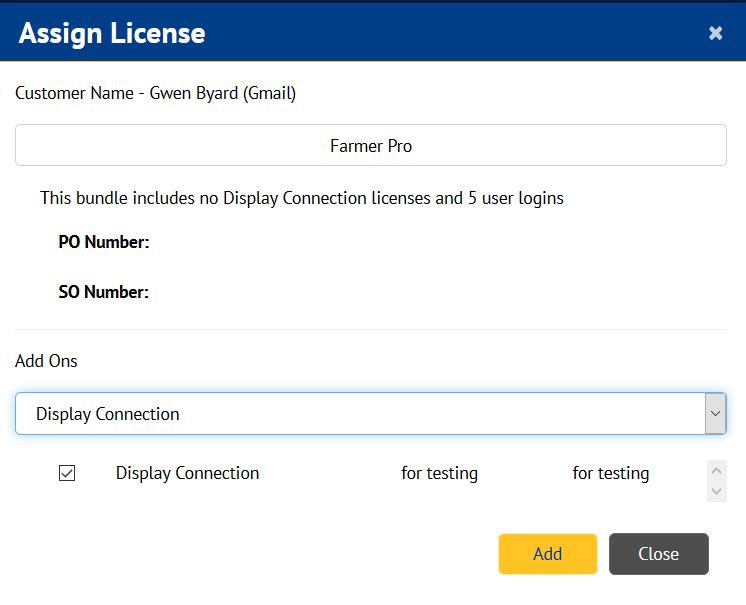
- Once you have chosen the licenses to assign, click Add.
Devices screen (Legacy)
The Devices screen provides over-the-air updates to the DCM-300 modems (product is end of life) that belong to your organization or to your customers’ organizations:
Description
| Item | Description |
|---|---|
| Last Reported In | The day and date that the DCM-300 modem last reported information to the Connected Farm solution. |
| Serial Number | A list of all the DCM-300 modems. |
| Customer | The name of the customer (organization). |
| Vehicle | The vehicle the device is associated with, if any. |
| Current Version | The current version of the product firmware. |
| Last Updated | The day and date that the DCM-300 modem was last updated |
| Update Version | The current update version for the particular modem. |
| Update Status | Whether the update is Pending (waiting for the customer to connect so that the firmware can be delivered), Complete (that is, the firmware was delivered successfully), or Failed. If the delivery failed, a Retry button appears, allowing you to redeliver the firmware. |
| Export button | Click to export all the data on the page to a csv file. |
Upgrading a DCM-300 modem
To start the OTA firmware upgrade process for a DCM-300 modem, make sure the DCM-300 Firmware Updates section is open on the Devices page.
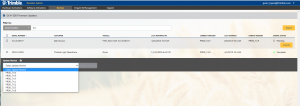
In this screen, all DCM-300 modems associated with the reseller’s organization or associated with the reseller’s customers’ organizations are shown. You can filter the DCM-300 modems on the screen by All, Vehicle, Customer, Serial Number, Current Version, Update Version, or Last Reported. You can sort the modems by Serial Number:
To update a device:
- Select the device by clicking the check box to the left of the device Serial Number, select Update Version (near the bottom of the list) and then choose a version of Firmware to update to:
Note – You cannot downgrade devices using this tool – they can only be updated with their current version of firmware or higher.
- Click Update Selected to start the update. The update may be cancelled early in the update process by clicking the Cancel button that appears in the Update Status column while it is permitted to cancel the update.
- If the update completes successfully, Complete appears in the Update Status column.
- If an update fails, Failure appears in the Update Status column. To retry the update, click the Retry button
The update process typically takes 30 minutes or longer to complete. If the firmware update process does not complete successfully, contact Trimble support.